|
The Inspector Panel

The Inspector panel displays the attributes of the currently selected item, whether it be a role, goal, task, or appointment (tasks and appointments are described in the next section ). These attributes include the item's title, priority, budget, color, completion status, and description. All of these items can be changed by you. ). These attributes include the item's title, priority, budget, color, completion status, and description. All of these items can be changed by you.

 |
An item's title is the text used to identify it in the browser, task list, or schedule. If you change an item's title, the list it's displayed in may be reordered, since the lists in the browser, task list, and to-do lists are all sorted alphabetically by title and numerically by priority. |
|
 |
An item's priority allows you to assign relative importance to each role, goal, or task. Items with higher priorities are listed before items with lower priorities. Items with the same priority are ordered alphabetically by their title. |
|
 |
An item's budget is the number of hours you would like to spend on that item during a certain time period. Each role, goal, and task can have its own budget amount. |
|
|
The period is specified with the pop-up list to the right of the budget field. Each time you inspect an item, the period is set to the current summary period. If you change it to a different value, that new value will be used, but, the next time you inspect the item, the current summary period will be used with the hours adjusted accordingly. |
|
 |
An item's background color is used to distinguish it from other items in schedules. When an item is displayed in a schedule, its background is drawn with this color. Each role, goal, and task can have its own color. New items inherit the color of their parent, so you can set the color for a role, for instance, and have all of its new goals created with the role's color. Additionally, all of these goals' sub-goals and tasks will inherit the color as well. |
|
|
You can change an item's color by using the Colors panel (found in the Tools menu ). When you change an item's color, you change only that item's color. If you wish to change the color of an item and that of all of its already-existing children, use the Copy Color command, found in the Agenda menu ). When you change an item's color, you change only that item's color. If you wish to change the color of an item and that of all of its already-existing children, use the Copy Color command, found in the Agenda menu . . |
|
 |
An item's completion status is reflected by the Completed checkbox. When you complete an item, check this box. If you change your mind, you can uncomplete the item by clicking again. The same thing can also be accomplished with the Complete/Uncomplete command in the Agenda menu . . |
|
|
All completed items are displayed with a checkmark to the left of their priority in the Tasks window . They are also listed after all uncompleted items. . They are also listed after all uncompleted items. |
|
 |
An item's description text allows you to type in a brief description of the item. It can also be used as a place to keep notes about the item. Each role, goal, and task has its own description text. |
Once you are satisfied with the changes you've made in the Inspector, click on the Set button to apply them. If you wish to discard your changes, press the Revert button. If you press neither button, your changes will be applied when another item is displayed in the Inspector.
The Inspector panel has a pop-up list at its top. This list controls what type of information is displayed. You can select three options: Attributes, Repeat, and Remind. The attributes display was described above. The repeat and remind and remind displays apply only to appointments and will be described in later sections. displays apply only to appointments and will be described in later sections.
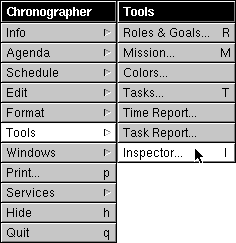
If the Inspector panel has been closed, it can be opened again: 1 Choose Tools from the main menu. 2 Choose Inspector... from the Tools menu.

The Inspector panel will be opened, brought to the front, and made key. Or, as a shortcut, you can simply click on the "i" button in a schedule window.
|
![]()
![]() ). These attributes include the item's title, priority, budget, color, completion status, and description. All of these items can be changed by you.
). These attributes include the item's title, priority, budget, color, completion status, and description. All of these items can be changed by you.

![]() and remind
and remind![]() displays apply only to appointments and will be described in later sections.
displays apply only to appointments and will be described in later sections.
