The Tasks Window
![]()
The Tasks window displays the tasks associated with the currently selected goal.
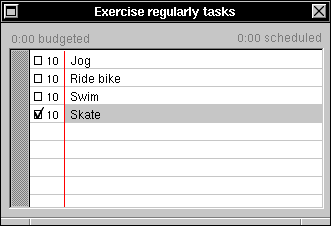
The numbers to the left of the task names are their priorities. To edit a task's priority, just click on it. Checkmarks to the left of the priorities indicate that those tasks have been completed. To mark a task as completed or uncompleted, click on its checkbox.
Roles can't have tasks associated with them, so the task list is always empty when a role is selected in the browser.
You can print the tasks listed in the window by choosing the Print... command from the main menu while the Tasks window is selected.
The Tasks window has summaries just like the Roles & Goals
window![]() , except that its summaries apply
to the selected task, unless no task is selected, in which case they apply to the goal
that the tasks belong to.
, except that its summaries apply
to the selected task, unless no task is selected, in which case they apply to the goal
that the tasks belong to.
To the upper-left of the task list is a text field that summarizes how much time has been budgeted for the selected task.
To the upper-right of the task list is another text field that summarizes how much time has been scheduled for the selected task.
The period of time that this summary covers is the same one used in the Roles &
Goals window and can be selected in Preferences![]() . The default period is the
current week, beginning on Sunday.
. The default period is the
current week, beginning on Sunday.
When the summary period is changed, not only does the scheduled time summary change, but the budget summary changes as well to reflect the new time period. For example, if a budget is set for 40 hours a week, and you change the summary period to one year, the budget will then be displayed as 2080 hours.
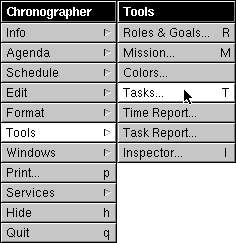
If the Tasks window has been closed, it can be opened again: 1 Choose Tools from the main menu. 2 Choose Tasks... from the Tools menu.
The Tasks window will be opened, brought to the front, and made key. Or, as a shortcut, you can simply click on the goal button in a schedule window.