Schedule windows
![]()
Before you can create any appointments, you need to have a schedule window open. Schedule windows cover either one day, one week, one month, or one year, depending on which view is selected.
The date that the schedule window covers is displayed in its title bar. By
default, a schedule window for the current day is automatically opened each time you start
Chronographer. (This behavior can be changed in Preferences![]() .)
.)
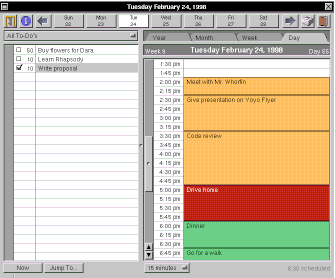
A schedule window has two main parts: a to-do list on the left and a schedule on
the right. The to-do list is explained in the next section![]() .
The schedule is explained in the section after that
.
The schedule is explained in the section after that![]() . If you wish to change the
relative amount of space used to display the to-do list and the schedule, drag the divider
between them to where you would prefer the division to be.
. If you wish to change the
relative amount of space used to display the to-do list and the schedule, drag the divider
between them to where you would prefer the division to be.
![]()
At the top of the window is a button bar. The buttons in the middle of the bar
display dates near the schedule date, including the date displayed in the schedule, which
is highlighted.
Which dates are displayed depend on the schedule view displayed: the day view displays dates for the other days of the week, the week view displays dates for the previous and next three weeks, the month view displays dates for the previous and next three months, and the year view displays dates for the previous and next three years.
When you move the schedule forward or backward, the dates on the bar will shift to the
right or left so that the schedule date is kept in the center. An exception to this
rule are the dates for the day view, which always begin with the day you selected as the
start of the week in preferences![]() (Sunday, by default; Monday, in
this example). However, if you prefer, you can have the day that is displayed in the
schedule always remain in the center of the button bar, like the other views, by setting a
preference
(Sunday, by default; Monday, in
this example). However, if you prefer, you can have the day that is displayed in the
schedule always remain in the center of the button bar, like the other views, by setting a
preference![]() .
.
Clicking on one of the buttons changes the schedule to that date. If you hold down the Alternate key while clicking, a schedule for that date will be opened in another schedule window.
![]()
![]()
On either side of the day buttons are two arrow buttons. Clicking on the left arrow
button moves the schedule back. Clicking on the right arrow button moves the
schedule forward. The amount of time it moves is the amount displayed in the
schedule view, either one day, one week, one month, or one year.
If you hold down the Alternate key while clicking on the arrows, the schedule will move by one week rather than one day. Similarly, holding down the Shift key moves the schedule by one month, and holding down the Control key moves it by one year.
You can also change the schedule's date by using the commands in the Date menu![]() , which is found in the Schedule menu
, which is found in the Schedule menu![]() .
.
![]()
The button on the far left of the button bar controls the Roles & Goals![]() and Tasks
and Tasks![]() windows. Clicking on it
opens those windows if they were closed and closes them if they were open. The
button controls both windows because they work together.
windows. Clicking on it
opens those windows if they were closed and closes them if they were open. The
button controls both windows because they work together.
![]()
This button controls the Inspector panel![]() . It works just like the
Roles & Goals button.
. It works just like the
Roles & Goals button.
![]()
The button just to the right of the date buttons contains a printer icon. Clicking
on it causes the window's schedule to be printed. See the section on printing for more
information![]() .
.
![]()
This button hides the application. It is equivalent to selecting the Hide
command on the main menu.
![]()
Immediately above the schedule is a text field displaying the date selected in the
schedule as well as its week and day number. The week number is calculated using the
week with January 1 in at as week #1. In the week, month, and year views, as you
select different dates, this field will display the newly selected date.
![]()
In the lower-left corner of the window is a button labeled "Now". Clicking it
changes the schedule to the current day. It also scrolls the schedule to the current
time for the day and week views.
![]()
This button, next to the "Now" button, opens a panel which allows you to jump to
any date. See the section on the Jump To panel for more information![]() .
.
You can also open the Jump To panel by using the Jump To... command, which is
found in the Date menu![]() , which is found in the Schedule
menu
, which is found in the Schedule
menu![]() .
.
![]()
In the bottom center portion of the schedule window lies a pop-up list that controls the
amount of detail displayed in the day and week schedule views. The default is 15
minutes per line, but that can be changed to 5, 30, or 60 minutes. The detail level
for the day view is independent of the detail level of the week view.
You can also change the schedule's detail by using the commands in the Detail
menu![]() , which is found in the Schedule
menu
, which is found in the Schedule
menu![]() .
.
![]()
When the month view is displayed, this button appears in the place of the detail
button. When pressed, it opens a panel that allows you to select which types of
appointments are displayed in the month view. See the section on the Filter panel
for more information![]() .
.
You can also open the Filter panel by using the Filter... command, which is
found in the Schedule menu![]() .
.
![]()
In the lower-right corner of the window is a text field that tells you how much time you
have allocated for the appointments displayed in the schedule. The dates covered by
this summary are the dates displayed in the schedule: one day for the day view; one
week for the week view. This summary is not displayed for the month and year views.
If one or more appointments in the schedule are selected, this field displays the total
time that has been scheduled for the selected appointments. Through a preference![]() , this field can be changed to
display the amount of time scheduled for the selected appointment's task, goal, role, or
color. If this is the case, then the amount of time displayed will be the total
scheduled for all appointments displayed in the schedule belonging to the selected
appointment's task, goal, role, or color, not just the time scheduled for the selected
appointment.
, this field can be changed to
display the amount of time scheduled for the selected appointment's task, goal, role, or
color. If this is the case, then the amount of time displayed will be the total
scheduled for all appointments displayed in the schedule belonging to the selected
appointment's task, goal, role, or color, not just the time scheduled for the selected
appointment.